

The .pem File in the Slack Channel
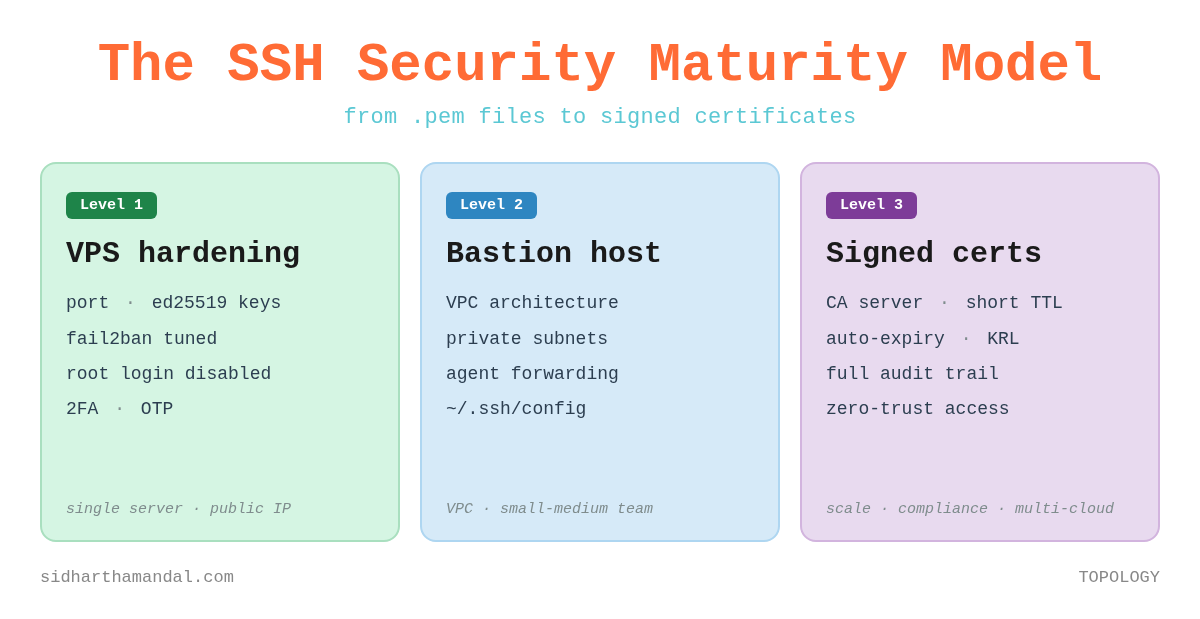
The SSH Security Maturity Model - from shared keys to signed certificates

I have seen this exact sequence play out at three different companies.
A new engineer joins. On their first day, someone drops a .pem file into Slack. “Here’s the key to the dev server. Don’t share it.” Everyone laughs a little because everyone already has the same key. The engineer downloads it, tucks it into their ~/Downloads folder, and promptly forgets about it.
Six months later, that engineer moves on. The offboarding checklist says “revoke access” - but no one quite knows what that means for a shared key. The ticket stays open. The .pem file stays valid. Somewhere on a MacBook that’s been passed to someone else, it still exists.
Two years later, a security audit asks: who currently has access to your production instances? The honest answer is: everyone who has ever worked here, and possibly their personal laptops.
SSH security is not a configuration problem. It is an architecture problem. And most teams are solving it at the wrong level.
This post is a maturity model - three layers of SSH security, each appropriate for a different scale and risk profile. You do not have to reach Level 3 to be secure. But you should consciously know which level you are at, and why.
First: Know What You Are Protecting
Before choosing your approach, be honest about your context. The threat model changes completely depending on where your servers live.
A VPS with a public IP - DigitalOcean, Linode, a single EC2 instance with port 22 open to the internet. The attack surface is the server itself. Harden it.
A VPC with private subnets - AWS, GCP, Azure. Your instances are not directly reachable from the internet. You need a controlled entry point. This is the bastion host model.
A VPC at scale with many engineers and many instances - shared .pem files become operationally unmanageable and auditably indefensible. You need SSH certificates with short-lived, signed access. This is zero-trust SSH.
Most teams operate at Level 1 regardless of which context they are actually in. Let us fix that.
Level 1 - Hardening a Public-Facing Server
If you have a VPS or a single EC2 instance with SSH exposed to the internet, start here. The goal is to reduce the attack surface of the server itself, layer by layer.
a. Kill Root Login. Create a Named User.
There is no legitimate reason for direct root SSH access in 2026. Every action taken as root is unattributable and unauditable. Create a named user, give it sudo privileges, then lock root out entirely.
# Create the user
adduser <username>

# Grant sudo privileges
usermod -aG sudo <username>

# Then in /etc/ssh/sshd_config:
PermitRootLogin no

# Restart SSH after every sshd_config change
systemctl restart
The -aG flag is important - ‘a’ appends the user to the group rather than replacing their existing group memberships. Without it, you can silently strip a user of other group access.
b. Keys Over Passwords - and Choose Your Algorithm
Passwords are brute-forceable. SSH keys are not. But the algorithm you choose matters.
Ed25519 is the right choice today. It is faster, shorter, and cryptographically stronger than RSA. Unless you have a specific compatibility constraint with legacy systems, use it:
ssh-keygen -t ed25519 -C “user@domain.com”If you are on a system that does not support Ed25519, RSA with 4096 bits is the fallback. Avoid DSA entirely - it is limited to 1024-bit keys by the standard, which is considered broken. Avoid ECDSA unless you fully understand the curve parameters and trust them.
# Fallback only - prefer Ed25519
ssh-keygen -t rsa -b 4096 -C “user@domain.com”

# Copy the public key to the server
ssh-copy-id -i ~/.ssh/id_ed25519.pub user@remote-host

# Then disable password auth in /etc/ssh/sshd_config
PasswordAuthentication no
GSSAPIAuthentication no
c. File Permissions - SSH Is Strict and Rightfully So
SSH will silently refuse to use your keys if permissions are wrong. This catches more people out than it should.
# On your workstation
chmod 700 ~/.ssh
chmod 600 ~/.ssh/id_ed25519.       # private key - only you
chmod 644 ~/.ssh/id_ed25519.pub    # public key - readable

# On the server
chmod 700 ~/.ssh
chmod 600 ~/.ssh/authorized_keys
The private key at 600 is non-negotiable. If it is world-readable, SSH refuses to use it. The error message - “WARNING: UNPROTECTED PRIVATE KEY FILE” - is SSH doing you a favour.
d. Rate-Limit the Knock with fail2ban
Port 22 on a public IP will be knocked on constantly - automated scanners, credential-stuffing bots, slow-and-low probes. fail2ban watches the auth logs and bans IPs that exceed a failure threshold. The defaults are too lenient. Tune them:
# /etc/fail2ban/jail.local
[sshd]
enabled = true
banaction = iptables-multiport
maxretry = 3
findtime = 1d
bantime = 4w

# Add to Boot and start the daemon service
systemctl enable fail2ban && systemctl start fail2ban

# Check who is currently banned
fail2ban-client status sshd
Three failed attempts in a day earns a four-week ban. That stops brute-force and slow-and-low attacks alike. The key insight: an attacker who gets banned on the third attempt will move on. There are easier targets.
e. Two-Factor Auth - Because Keys Can Be Stolen Too
A compromised laptop means a compromised private key. Adding a second factor means an attacker needs your private key AND your phone. For any server with a public IP, this friction is worth it.
# Install the package
apt install libpam-google-authenticator

# Run it
google-authenticator

# Answer: y y y n y to the prompts
# Scan the QR code with your authenticator app

# Add to the TOP of /etc/pam.d/sshd:
auth required pam_google_authenticator.so

# In /etc/ssh/sshd_config:
ChallengeResponseAuthentication yes
AuthenticationMethods publickey,keyboard-interactive
After this, login requires your private key first, then the OTP. Both must succeed. An attacker with your key but not your phone goes nowhere.
The principle underlying all of Level 1 is layered defence. Each measure is independent - a failure in one does not collapse the others. Root login disabled, key-only auth, rate limiting, and 2FA are four separate gates. An attacker has to defeat all of them, not just one.
Level 2 - Bastion Host Architecture
The day you move your application servers into a VPC with private subnets, the threat model shifts. Your instances should not be reachable from the internet at all - not even on port 22. The bastion host becomes the single controlled entry point into the private network.
[ Internet ] → [ Bastion - public subnet ] → [ Private instances - private subnet ]
The bastion itself should be hardened with everything in Level 1. The key architectural decisions beyond that are about how keys flow - or more precisely, about ensuring they don’t flow to the wrong place.
Never Store the Private Key on the Bastion
This is the most common Level 2 mistake I see. The bastion is a proxy, not a key store. If it is compromised and your .pem is sitting on it, every instance it can reach is now compromised too.
Use SSH agent forwarding instead. Your workstation holds the key. The agent handles authentication end-to-end. The private key never leaves your machine/laptop - it is used to sign the authentication challenge locally, and only the signature travels over the wire.
# ~/.ssh/config

# Bastion entry point
Host bastion-vpc1
  Hostname <bastion-public-ip>
  User ec2-user
  IdentityFile ~/.ssh/id_ed25519
  ForwardAgent yes

# Route any private IP in VPC-1 through the bastion transparently
Host 10.1.*.*
  User ec2-user
  IdentityFile ~/.ssh/id_ed25519
  ProxyCommand ssh bastion-vpc1 -W %h:%p

# Sensible defaults - keep this at the END of ~/.ssh/config
Host *
  ServerAliveInterval 30
  ServerAliveCountMax 2
  StrictHostKeyChecking accept-new
With this config, ssh 10.1.1.45 routes through the bastion automatically. Engineers type a single command. The hop is invisible to them.
One note on StrictHostKeyChecking: the original version of this article used StrictHostKeyChecking no paired with UserKnownHostsFile /dev/null. Do not do this. Those two settings together disable host key verification entirely and discard all verification state - which opens the door to man-in-the-middle attacks. accept-new is the safe default: it automatically trusts new hosts on first connection, but rejects any subsequent change to a known host’s key. That is the behaviour you actually want.
The gap Level 2 does not close: the shared key problem. Everyone on the team uses the same key-pair. When someone leaves, you either rotate across every instance or accept the risk that they still technically have access. Most teams accept the risk. Most teams should not.
Level 3 - Signed SSH Certificates: Zero-Trust at Scale
I want you to think about what trust actually means in the key-based model. You add a public key to authorized_keys on a server. That key now has access to that server indefinitely - until someone manually removes it. There is no expiry. No central revocation. No audit trail of who used it when.
Now multiply that across fifty engineers and two hundred instances. You have a trust graph that nobody fully understands, that grows with every hire and never fully shrinks with every departure.
SSH certificates solve this by introducing a Certificate Authority. Instead of distributing keys to servers, you issue short-lived signed certificates. Access expires automatically. Trust is centralized.
The architecture has three roles: a CA server that holds the signing keys and issues certificates, target servers that trust the CA rather than individual keys, and engineers who present a signed certificate to authenticate.
Setting Up the CA
On your CA server, generate two signing key-pairs - one for hosts, one for users. Keep these keys offline or in a secure secrets manager. They are the root of trust for your entire fleet.
# Host CA - proves the server is legitimate (prevents MITM)
ssh-keygen -t ed25519 -N ‘’ -C HOST_CA -f /etc/ssh/ca/host_ca

# User CA - proves the engineer is legitimate
ssh-keygen -t ed25519 -N ‘’ -C USER_CA -f /etc/ssh/ca/user_ca
Signing a Host Certificate
Each server gets a signed host certificate. This is the part most teams skip - and it is important. Without it, engineers are still vulnerable to MITM attacks on their first connection to a new host. With it, the SSH client can cryptographically verify the server’s identity without relying on the trust-on-first-use model.
# Create Host Certificate
ssh-keygen -s /etc/ssh/ca/host_ca \
-I host_server01 \
-h \
-n server01.internal \
-V +52w \
/etc/ssh/ssh_host_ed25519_key.pub

# Reference in /etc/ssh/sshd_config on the server:
HostCertificate /etc/ssh/ssh_host_ed25519_key-cert.pub
Signing a User Certificate
An engineer submits their public key. The CA signs it with a short validity window and an explicit list of allowed usernames - called principals. The certificate expires. The engineer has to come back for a new one.
# Create User Certificate
ssh-keygen -s /etc/ssh/ca/user_ca \
-I <username>_laptop \
-n ec2-user,ubuntu \
-V +16h \
~/.ssh/id_ed25519.pub

# Produces: id_ed25519-cert.pub
# Engineer copies it to ~/.ssh/ - SSH picks it up automatically
Note on validity: the right TTL for user certificates in a zero-trust model is hours, not weeks. +16h to +24h is the production standard - long enough for a working day, short enough that a stolen certificate has a very narrow window. A 5-week certificate is not short-lived; it is just a key with a distant expiry date.
On every server, configure sshd to trust the user CA instead of managing authorized_keys:
# /etc/ssh/sshd_config
TrustedUserCAKeys /etc/ssh/ca/user_ca.pub
You can inspect any certificate to verify its principals and expiry:
ssh-keygen -L -f ~/.ssh/id_ed25519-cert.pub
# Output shows:
# Valid: from 2025-05-06T08:00:00 to 2025-05-07T00:00:00
# Principals: ec2-user, ubuntu
# Key ID: “alice_laptop”
What This Changes Operationally
Onboarding: engineer submits public key → CA signs it → done. No touching authorized_keys on any server. No Slack messages with .pem files.
Offboarding: the certificate expires on its own - within 24 hours if you are using short TTLs. For immediate revocation, add the certificate serial to a Key Revocation List (KRL) and distribute it. One operation, fleet-wide effect.
Audit: every certificate carries an identity (the key ID) and a serial number. Your access logs now show not just which IP connected, but which engineer and from which machine.
Rotation: when you rotate the CA key, you issue new certificates to all hosts and users. One change, everything re-issues naturally. Compare this to rotating a shared .pem across two hundred instances.
The Automation Gap
Signing certificates manually works for a team of five. It does not work for a team of fifty. HashiCorp Vault’s SSH secrets engine handles this natively - engineers request a certificate via Vault, it is signed and returned with a configured TTL, and Vault maintains the full audit log. Engineers never see the CA private key. That is the production-grade implementation of this model, and the right destination for any team with compliance requirements.
Choosing Your Level
Single VPS with public IP → Level 1. Harden the server. Layers of independent controls.
Small team, VPC, stable headcount → Level 2. Bastion host, SSH config, agent forwarding. No keys on the bastion.
Growing team, frequent joiners and leavers → Level 3. Signed certificates with short TTLs. Centralized trust.
Compliance requirements (SOC2, ISO 27001) → Level 3, non-negotiable. The audit trail is the requirement.
Multi-cloud with many instances → Level 3. Shared keys do not scale operationally or auditably.
The levels are cumulative, not alternatives. Level 3 still uses a hardened bastion. Level 2 still applies the server hardening from Level 1. Each layer builds on the one below.
The .pem File Is Still Out There
The Slack message from the opening of this post - “Here’s the key, don’t share it” - is not a security failure by any individual. It is a systems failure. When your process makes the insecure thing the easy thing, the insecure thing is what happens.
SSH certificates make the secure thing the easy thing. Onboarding is a single signing operation. Offboarding is automatic. The audit trail is built in. The blast radius of a compromised credential is bounded by its TTL.
Most teams wait for a security incident, an audit finding, or an ex-employee’s name appearing in an access log before they rethink their SSH model. The better time is before any of those things happen.
The .pem file in the Slack channel is not a starting point. It is a liability with a countdown.
If this helped you think through where your team sits on this model, share it with whoever owns your security posture. And if you have already made the journey to signed certificates - I’d genuinely like to hear what your team’s implementation looks like.
Subscribe for free to receive new posts and support my work - or go paid for early access, deeper dives, and the occasional piece that never goes public..